A Garden Anyone Can Grow
I’m not exactly known for having a green thumb (even though I’m a very devoted composter), but I wish I were better at keeping plants alive. Really, I do. Partly because the idea of eating fruits and veggies I grew with my own two hands is so appealing on a farm-to-table lovin’ foodie level, but also? I can be strangely frugal about certain things, and it irks me so much to spend so much money on, say, a small bunch of fresh herbs of which I only need a few sprigs (and which will almost certainly be no good within a week).
So, I’m always on the lookout for ways to grow my own with more or less guaranteed success, and when Back to the Roots reached out to tell me all about their indoor herb and veggie growing kits, I was pretty darn optimistic about how great a farmer I was about to become.
via GIPHY
I also really like their mission, which they call Undo Food. Back to the Roots is all about reconnecting people with where food actually comes from, and they even offer a Grow One, Give One program where, if you purchase an Indoor Gardening Kit and take a picture with it, they’ll donate one to the classroom of your choice. As far as what you can grow, there are loads of options, including an organic mushroom farm growing kit, a water garden (which you can keep a pet fish in!), self-watering pepper planters, a self-watering cherry tomato planter, and a kitchen herb garden, which is what I opted to try.
(Baby steps, people. I may dream of aquaponics, but I think starting with some seeds in a can is probably wise.)
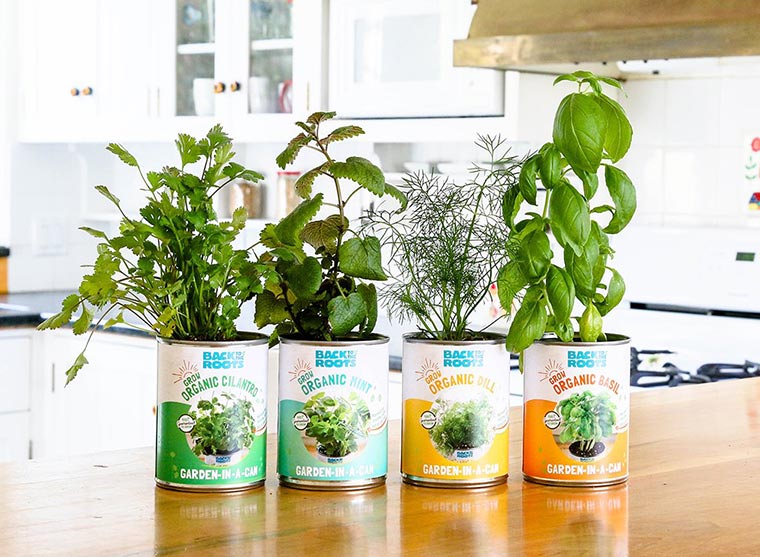
Right! So! I got my cans and got right to work … which wasn’t actually much work at all. I opened each of my four cans — basil, cilantro, mint, and dill — and found a pack of corresponding seeds within them. The full package came with another set of seeds as well, so if something were to go wrong, I knew I had a second chance.
The instructions to get started were simple but complete.
- Dampen soil with 1/2 cup of water.
- Add seeds to corresponding can of soil (which is organic plant-based soil with biochar to prevent over- and underwatering).
- Press seeds 1/4 inch into the soil.
- Each day, add 1-2 tablespoons of water and watch for seeds to germinate over the next week or two.
Now, I’ve been through this before with some success. Where I’ve run into trouble is with figuring out what to do next, and happily, those steps are just as clear.
- As plants mature, they might need a bit more water — up to 3 tablespoons. But only if the top soil is dry — if it’s still moist, don’t water that day.
- Thin the plant to three stems once it reaches 1.5 inches in height. To do this, add a bit of water to the soil to soften it, then carefully pull out stems by the part closest to the soil without disturbing other plants. Add a little more water to fill in the gaps left behind.
- In 2-3 months, harvest the plant by clipping from the can — no need to transplant!
Here’s what’s super cool for someone like me. Up until you harvest, the instructions are identical for each type of plant, so while there’s a bit of a learning curve, it’s very small. The harvesting directions differ slightly for each plant, but it’s straightforward. I’m not there just yet (I’m coming up on the three-week mark now), but given how it’s gone so far, I’ve got high hopes.

My personal garden, about 2.5 weeks in. The cilantro took off like a shot and has been thinned a ton! And that dill? Came outta nowhere after two weeks of silence. So cool.
One note for fellow gardening novices: These sprouted at very different paces. I honestly thought I was going to have to give up on my dill because the other three came in so quickly and strongly and there wasn’t a peep from ol’ dilly, but I kept watering it, spoke encouraging words to it (yes, really), and seriously, the day it decided to show up, it just plowed through that top soil and I had three serious shoots by the end of the day. Crazy! Who knew gardening was so exciting?
In addition to making this whole process user-friendly for a noted plant-murderer like me (and, I mean, Back to the Roots goes so far as to help you figure out where in or around your house to put the plants based on time of year, and they offer videos, and even explain what to expect from each plant as it grows), but they even have a Garden Toolkit curriculum available so teachers and parents can help kids grow plants successfully, too. It’s seriously cool.
So, if you’re interested in starting an herb garden but not totally sure how to really get growing, remember, you can do it — and a Garden in a Can might be just the thing you need! (I’m also thinking that this would be a cool gift for a few people I know. Stay tuned.)
What’s the last thing you planted and grew successfully? I have a lovely jasmine plant out in my backyard that’s positively taking over … and then another one that seems to have a foot in the grave. Sigh. Anybody got one of those in a can for me? —Kristen
Comments
This gives me an idea to recycle tin cans and plant some leafy vegetables. This is such a great idea, having your own organic plants. Thumbs up to this!
Comments are closed.